How to Wire a 3-Way Switch
When learning how to wire a 3-way switch circuit, we also need to understand the functionality of the 3-way switch. The 3-way switch is simply
controlling the power flow (Switching off/on) to the load (a light,
lamp, outlet, ceiling fan etc..) from 2 different locations.
A couple
examples would be:
At each end of a hallway.
At the top & bottom of a stairway
Each 3-way switch in these examples are controlling the power source to the same load.
Learning how to wire a 3-way switch is a little more tricky than wiring a 2-way switch. First of all we need to go over a little basic terminology on switches. Go to my Switch Terminology Page where I discuss the terms used for the different types of home electrical switches. It should also help in understanding the functions of each type of switch.
When wiring a 3-way switch circuit, we will be using a 3-wire cable known as romex coming from the source (such as the breaker box). Then a 4-wire cable going between the two 3-way switches and then a 3-wire cable going from the switches to the load. The 3-wire cable consist of a black wire, a white wire and a bare copper wire, while the 4-wire cable has an added red wire which is hot as well. See Below..
3-Wire Cable
Black wire = Power or Hot wire
White wire = Neutral
Bare copper = Ground
4-Wire Cable
Red wire = Power or Hot wire
Black wire = Power or Hot wire
White wire = Neutral
Bare copper = Ground
When learning how to wire a 3-way switch circuit, all we want to do is to control the black wire (hot wire) to turn on and off the load from 2 different locations. The diagram below will give you a better understanding how this circuit is wired.
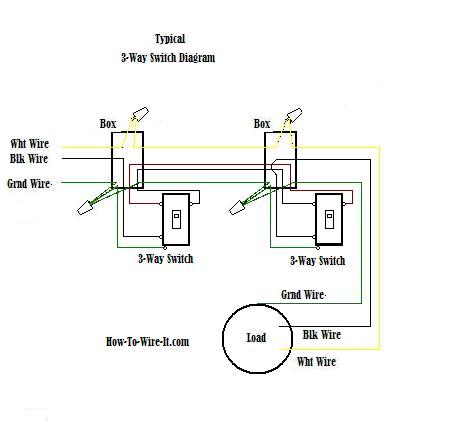
Notice that there is a 3-conductor cable coming into the first box, then a 4-conductor cable going from left box to right box, then a 3-conductor cable going from the right box to the load.
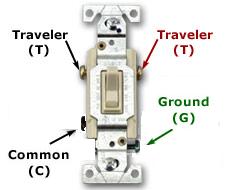
Now for wiring, lets assume you're looking at the switch just like it shows.
The Left Box:
The lower left screw is the common and gets the black wire from the source (3-cond). The upper left screw gets the black wire from the right box (4-cond). The upper right screw gets the red wire from the right box (4-cond). The white wires tie together with a wire nut. The bare copper wires tie together with a wire nut. Be sure to attach a bare copper wire to the green screw on the switch.
The Right Box:
The lower left screw is the common and gets the black wire from the load (3-cond). The upper left screw gets the red wire from the left box (4-cond). The upper right screw gets the black wire from the left box (4-cond). The white wires tie together with a wire nut. The bare copper wires tie together with a wire nut. Be sure to attach a bare copper wire to the green screw on the switch.
The diagram below will give you a good understanding of what this circuit is accomplishing.
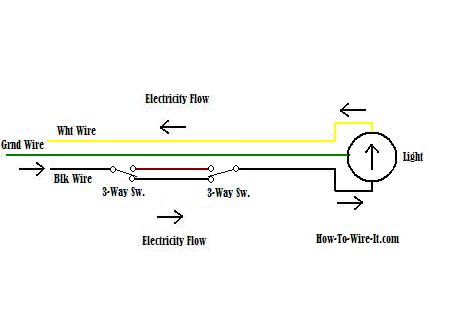
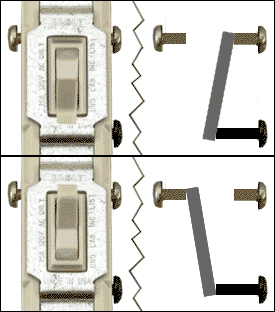
Follow along with the mouse pointer as we go through this. The source power (black wire) is coming in from the left. It ties into the common on the left switch. When the left switch is toggled, it connects to the upper circuit and now the circuit is open at the right switch which turns off the light. Toggle the right switch and it connects to the upper circuit and now closes the path and turns the light back on and so on. Congratulations! on wiring a 3-way circuit.
In my mind wiring is one thing, but to look at a diagram as the one above and understand the principle involved, that is the key to do-it-yourself house wiring.
If you're simply replacing a 3-way switch, the diagrams below will show the different scenarios on how your circuit could possibly be wired.
Is your Situation Like any of the Following Diagrams?
Power-Switch-Switch-Light
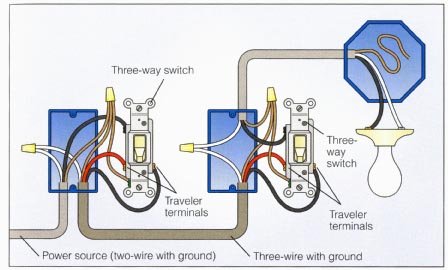
Here you see the power is coming into the circuit through
the 1st 3-way switch box, then using a 4-wire cable to the
2nd 3-way switch box, then to the light using a 3-wire cable.
Power-Light-Switch-Switch
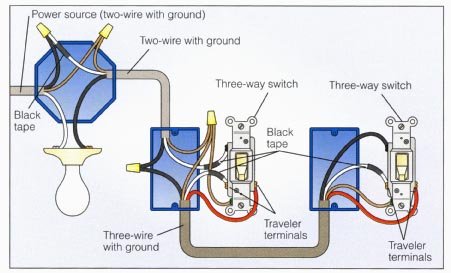
Here you see the power is coming into the circuit through
the light box, then using a 3-wire cable to the
1st 3-way switch box, then to the 2nd switch box using a 4-wire cable.
(Notice the white wire from the switch is used as hot,
therefore there is a piece of black tape on the white wire to
indicate that it is being used as a hot wire).
Switch-Light/Power-Switch
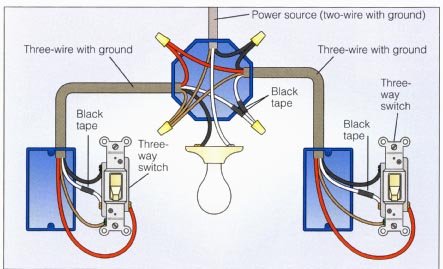
Here you see the power is coming into the circuit through
the light box, then using a 4-wire cable to each 3-way switch box individually.
This will be the most popular 3-way switch circuit commonly seen at each end of a hallway, Top & bottom of a stairway or opposite sides of the room.
All controlling the same light.
(Notice the white wire from the switch is used as hot,
therefore there is a piece of black tape on the white wire
to indicate that it is being used as a hot wire).
What is common in the diagrams above and with any 3-way switch circuit is that the power hot wire coming into the circuit will always go to the common terminal of the first switch. The hot wire from light always goes to the common terminal of the second switch. The traveler wires go from switch to switch connected to the traveler terminals, it doesn't matter which. As long as you keep this in mind, a 3-way circuit becomes really simplified. And of course the neutral will always go directly to the load.
Here's a step-by-step procedure on how to wire a 3-way switch:
Materials and Tools You'll Need:
- Two 3-way switches
- 14/3 or 12/3 (depending on the circuit's amperage) electrical cable
- Wire stripper
- Screwdrivers
- Needle-nose pliers
- Voltage tester
- Electrical tape
- Wire connectors
Procedure:
- Safety First: Turn off the power to the circuit at the main breaker panel.Use a voltage tester to ensure there is no electricity flowing through the circuit you are working on. Test both switches to be certain.
- Identify the Wires: In most 3-way switch setups, you will have two 3-way switches and one light fixture. Identify the traveler wires, which are typically red and black, and the common wire, usually colored white or marked with black electrical tape.
- Remove the Old Switches: Unscrew the switch plates and remove the old switches from the electrical boxes.
- Install the First 3-Way Switch: Connect the black wire from the power source (usually black or white marked with black tape) to the common terminal on the first switch. Typically, the common terminal is dark-colored or labeled "COM." Connect one of the traveler wires from the second 3-way switch (red or black) to one of the traveler terminals on the same switch. Connect the other traveler wire from the second 3-way switch to the remaining traveler terminal on the first switch.
- Install the Second 3-Way Switch: Connect the black wire from the load to the common terminal on the second switch. Connect the traveler wires from the first 3-way switch to the traveler terminals on the second 3-way switch.
- Neutral Wires: Connect all white wires together with wire nuts in each switch box. The neutral wire from the power source should go directly to the load.
- Connect Ground Wires: If your electrical box has a ground wire (usually bare or green), connect it to the green or bare grounding terminal on each switch.
- Secure the Switches: Carefully tuck the connected wires back into the electrical boxes. Attach the switches to the boxes using the screws provided.
- Finishing Touches: Attach the switch plates to the switches and secure them with screws.
- Test the 3-Way Switches: Turn the power back on at the main breaker panel. Test the 3-way switches by flipping them up and down. The light should turn on and off from both switch locations.
- Double-Check and Insulate: After ensuring that the switches work correctly, use electrical tape or wire connectors to secure the wire connections in the boxes. Replace the switch plate covers.
Remember that it's essential to follow local electrical codes and safety guidelines when wiring a 3-way switch. If you're not confident in your electrical skills, it's advisable to consult a professional electrician to ensure the wiring is done correctly and safely. Electrical work can be dangerous, and safety should always be the top priority.
Allow Tim Carter from AskTheBuilder.com to show you some
great tips for installation on how to wire a 3-way switch.


