Wiring A DTV Converter

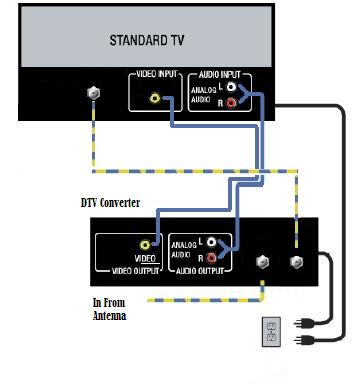
Wiring a DTV Converter box is a very simple process. Follow the steps below and you'll be viewing Digital T.V. Signals in no time. When wiring a DTV Converter to your television, be sure to disconnect the power from the wall for safety reasons so there is no possibility of electrical shock that could cause serious injury or damage to the components.
You only need the antenna connection shown in the diagram above, meaning you don't have to connect the Audio/Video connections. It is recommended that you use the Audio/Video since this will get you the best picture possible along with sound control.
If it makes easier to follow a printable document, feel free to open one of the PDF Link's below that relate to your situation and you can save and/or print it out so you have it right next to you while performing the task.
Step No.1
By following the diagram above, the first thing we need to do is disconnect your antenna cable from the back of your television set and connect the antenna cable to the "ANTENNA IN" connector on the back of the DTV Converter box.
Step No.2
Take out the coaxial cable supplied with the DTV Converter box and connect one end to the "ANTENNA OUT" connector on the back of the DTV Converter box and then connect the other end of the coaxial cable to your "ANT IN" connector on the back of your television set.
Step No.3
Now that takes care of the antenna, now let's connect the audio/video cables. Again, by following the diagram above, take out the audio/video cable that was supplied with your DTV converter box. You should have a three wire cable consisting of a red/white & yellow connector. Connect one end of the audio/video cables to your DTV Converter into the appropriate connectors and then connect the other end to the same color coded connectors on your T.V. set. If you have a game console or other device hooked up on these connections and have no more available ports on your T.V., then unfortunately your going to have to swap them out whenever you need to use one or the other.
Step No.4
Now plug both the T.V. Set and the DTV Converter box into the wall and you should now be ready to set-up your new DTV Converter.
Setting Up Your DTV Converter
Place batteries into the DTV Converter remote and power up both the T.V. set and the DTV Converter box. Your television will now have to be put on either channel 3 or 4, or select which input that you connected to on the back of your T.V. set. This will depend on the type of television set you own if you have an input option or not.
When you have selected the proper option, you should see a DTV set-up screen. When you get to this point you will now have to do a channel scan so the DTV converter can basically find all the channels that your antenna is capable of picking up. This could take a little time based on the amount of channels within your area. Once this is completed, you will now be able to use your DTV Converter box remote control to watch your television. Try the channel UP/DOWN arrows on your DTV remote to see all the channels that the converter box found when it went through the scanning process.
Now with DTV, the signal strength is entirely related to the type of antenna being used. Do a little playing around with your antenna to find an ideal location or position in order to maximize your signal. Most DVT Converters come with a signal viewer which should be located on your remote control. Use this to fine tune your antenna for best possible operation.
Congratulations and Enjoy your new DTV watching
Also, you may have the need to connect your VCR or other components in addition to the DTV converter. Just click on the following document for more in depth instructions.
Wiring DTV Converter - Basic Setup
Wiring DTV Converter - Twin Lead Antenna
Wiring DTV Converter - To Receive Analog & Digital
Wiring DTV Converter - With a VCR
Wiring DTV Converter - Trouble Shooting Guide


