Wire A Thermostat
In order to learn how to wire a thermostat, you must first be aware of the type of system that you have in your home. A large majority of homes today have an HVAC system containing a Furnace (Oil, Gas or Electric) and An A/C Unit. The thermostat wiring on these systems can have very similar wiring properties. But what if you have a system that's a little different like a Heat Pump System, Then your thermostat is going to be wired a little different as well.
First and foremost when you go to wire a thermostat, if you have any doubt of the type of HVAC system you have and are uncomfortable with wiring, then I highly recommend using a qualified HVAC service technician to complete your task. This could save you a lot of unnecessary expenses in the long run.
Now the thermostat circuits I will be covering will consist of the two scenarios I mentioned above. But an important issue here is that the diagrams and wiring color codes are going to be the most common standardize method. Always keep in mind that who ever wired your thermostat may not have followed these procedures and your color codes will not match the following examples. You will have to determine this before you start disconnecting any of your thermostat wiring.
If you're changing your old style thermostat to a programmable type, then most HVAC systems are compatible and will work just fine with a programmable unit. But in the case of a Heat Pump system, You'll really have to do some research to verify that the programmable thermostat will work. Heat Pump systems work entirely different from standard HVAC systems and require more circuits.
How to wire a thermostat
Things you will need:
Small flat blade screwdriver.
Needle nose pliers. (optional)
New recommended thermostat for your particular unit.
Camera. (Phone)
Step 1: Turn off the Power
Before you begin, turn off the power to your HVAC system at the circuit breaker or the main power switch. This ensures your safety while working with electrical components.
Step 2: Remove the Old Thermostat Take off the cover of your old thermostat by gently prying or unscrewing it. You will see wires attached to the backplate of the thermostat.
Step 3: Take a Picture of the Wiring Before disconnecting any wires, take a clear picture of the existing wiring configuration or label each wire with its corresponding terminal letter. This will help you during the installation of the new thermostat.
Step 4: Identify the Wires Common wires you might encounter include:
- R (Red): Power wire from the transformer.
- C (Blue or Black): Common wire, used to complete the circuit.
- Y (Yellow): Cooling wire, connects to the air conditioning unit.
- G (Green): Fan wire, connects to the fan.
- W (White): Heating wire, connects to the heating system.
Note that some thermostats might have additional terminals for features like a heat pump (O, B), a second stage of heating (W2), or a second stage of cooling (Y2).
Step 5: Disconnect the Old Thermostat Loosen the screws or release the clips holding the wires in place on the old thermostat's backplate. Carefully remove the wires while making sure they don't fall back into the wall.
Step 6: Install the New Thermostat Base Position the new thermostat's backplate on the wall and use a level to ensure it's straight. Secure the backplate to the wall with screws.
Step 7: Connect the Wires to the New Thermostat Refer to your new thermostat's instruction manual to determine which wire goes to which terminal. Typically, you'll match the wires based on their labels (R to R, C to C, Y to Y, etc.). Use a small screwdriver to secure each wire under the appropriate terminal.
Step 8: Install the New Thermostat Align the thermostat unit with the backplate and gently press it into place. Make sure it is level and snaps securely into position.
Step 9: Restore Power Turn the power back on at the circuit breaker or main power switch to provide electricity to the thermostat and HVAC system.
Step 10: Program the Thermostat Set the date, time, and desired temperature settings on your new thermostat according to the instructions in the manual.
Step 11: Test the Thermostat Verify that your heating and cooling systems respond to changes made on the thermostat. Check that the fan and other settings work correctly.
And there you have it! You have successfully wired and installed your new thermostat. Remember, if you're unsure about any step or have a complex HVAC system, it's best to consult a professional HVAC technician for assistance.
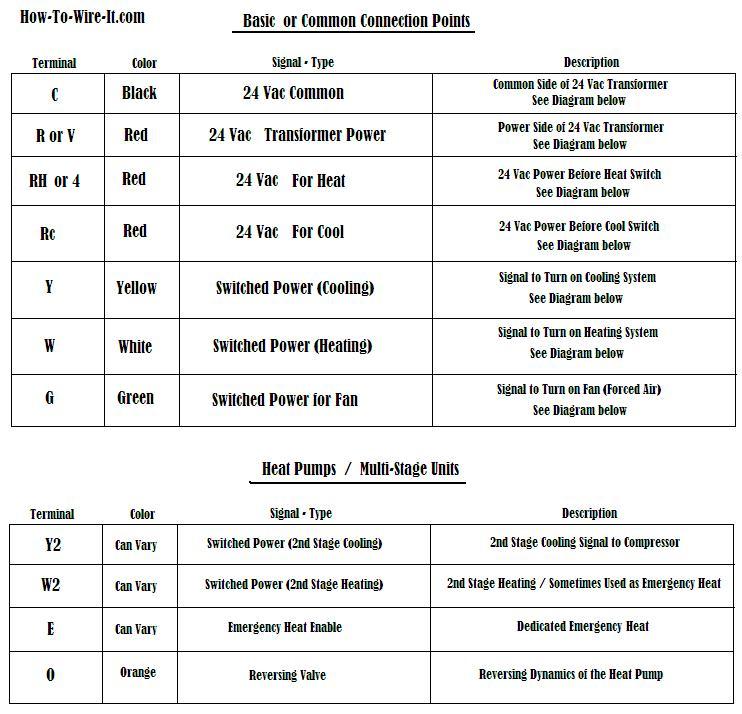
The following is a chart showing the most common terminals and their respective color codes and what that particular wire is used for in the circuit. Now most thermostat's will not have all of these termination points but the chart will help you determine color code and connection points for your particular unit.

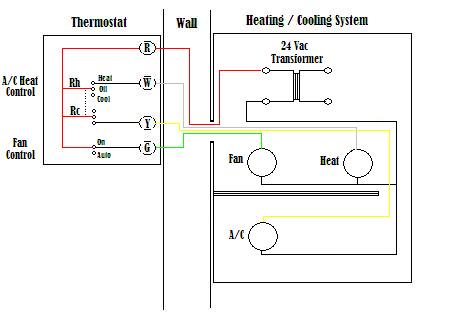
The diagram below shows how a basic 4-wire thermostat is connected as indicated by the color code chart above. The basic Heat + A/C System thermostat typically utilizes only 5 terminals.
RC - Red Wire (Power 24 Vac)
RH or 4 - Red Wire Jumpered (Power 24 Vac)
W - White Wire (For Heating Enable)
Y - Yellow Wire (For Cooling Enable)
G - Green Wire (Controls Fan ON-Auto)
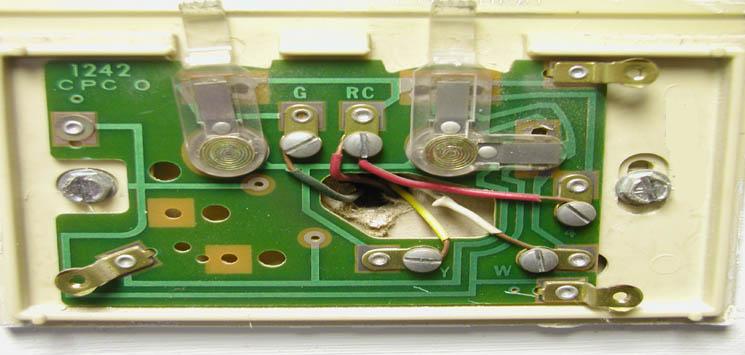
The diagram shows how the wiring works. However your connections may seem a little different on the thermostat itself. Just take a look at the picture below the diagram. The RED wire or 24 Vac power lead is connected straight to the RC & 4 terminals. Some thermostat units have a dedicated R terminal and it jumpers to the RC, RH or 4 terminals internally. The W, Y and G terminals should be pretty straight forward on most all types of thermostat's.

The following image is one of the most popular scenarios today. This type thermostat is relatively easy to connect or change over to a programmable type thermostat. As mentioned in the previous paragraph, the only difference might be the lack of an "R" connection.

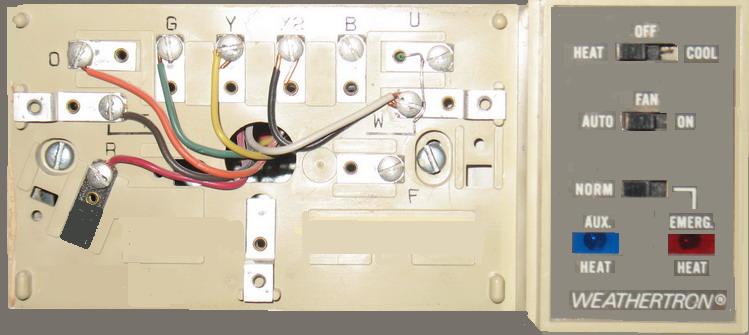
Now the following image here represents a heat pump system thermostat. These types systems are more involved because of the components associated with the system. Color codes may be different from one household to another, but generally the concept should be the same. It's going to take a little research on the owners part to declare what is involved with your heat pump system and verify proper color codes. If you're changing a heat pump system thermostat to a programmable thermostat, be sure that the new thermostat is compatible with your style of system. Once that is verified, the owners manual should be informative enough to complete the change over very easy.

Click here if you feel the need for a Qualified HVAC Service Technician.
Watch this video for assistance on upgrading or installing a programmable thermostat


