Wire A Dryer Cord
This page is dedicated to show you how to wire a dryer cord. The first place to start is to determine if you are wanting to replace your dryers outlet to match a different dryer cord or change out the dryer cord to match your dryer outlet. I will cover both situations. In the first section, I will be showing you how to wire a dryer cord that matches your 3-prong or 4-prong outlet.
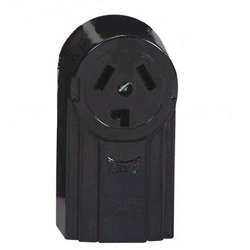
Most older homes are wired for the 3-wire outlet as shown below:
The 3-wire connection is now outdated where current dryers are wired with a 4-wire cable. The only difference is the addition of an isolated ground wire separate from the neutral, but the 3-wire circuit is still fine and does not have to be upgraded. You may want to check with your local codes to verify this.
Here is a picture of a 3-wire cable outlet:

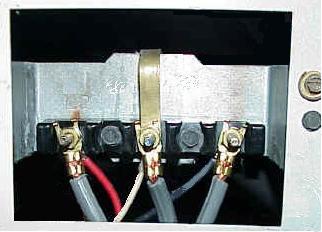
A 3-wire cord consist of 3 wires molded together. Looking at the cord end without the plug, the left and right wires are the hot wires and the middle wire is the neutral. In a 3-wire circuit, the neutral also acts as ground. The connections on your dryer should have three connection terminals. Left is hot - middle is neutral - and right is hot. You should notice a black & red wire from the dryer already connected to these terminals in the same manner. The middle connection should have a ground strap which connects to the white or neutral connection. This is the part of the circuit that changes when switching 3-wire to 4-wire as I will discuss later.

When you wire a dryer cord, some dryers depending on their age, will show labels on the screw connections. If so, L1=Hot, N=Neutral, and L2=Hot. The red and black wires (Left & Right if not color coded) can go on either hot terminal, it really doesn't matter. Just be very careful not to put a hot wire on the neutral connection. I will typically go by the wires that are connected internally from the dryer. On a 3-wire connection, also be sure the the ground strap is securely connected to the neutral connection (middle).
3-Wire
Step-by-step procedure to wire a dryer cord:
Materials you'll need:
- New 3-wire dryer cord (matching the amperage of your dryer)
- Screwdriver
- Wire stripper
- Wire nuts (if needed)
- Strain relief clamp (if not included with the cord)
- Pliers
Here's How:
- Safety First: Unplug the dryer from the electrical outlet and turn off the breaker that supplies power to the dryer circuit at the circuit breaker panel.
- Remove the Old Cord: If your dryer is currently using a 4-wire cord, you'll need to remove it. Unscrew the terminal screws on the terminal block at the back of the dryer to release the wires.
- Prepare the New Cord: Examine the new 3-wire dryer cord. It should have three wires: black (hot), white (neutral), and green (ground). (If your new cord has 3 grey wires, the 2 outside wires will be the (L1) & (L2) and the center (Middle) wire will be the ground wire). Strip about 1/2 inch of insulation from the ends of each wire using a wire stripper.
- Attach the Ground Wire: Insert the green wire into the center or top terminal on the terminal block (where the grounding screw is located). Tighten the screw to secure the wire. If a separate grounding screw on the dryer is provided, use it to attach the ground wire.
- Attach the Neutral Wire: Insert the white wire into the terminal on the terminal block labeled "N" or "Neutral." Tighten the screw to secure the wire.
- Attach the Hot Wires: The remaining black wire is the hot wire. There should be two remaining terminals, often labeled "L1" and "L2" or "X" and "Y." Insert the black wire into one of these terminals. Tighten the screw to secure the wire.
- Strain Relief (if needed): If the new cord did not come with a strain relief clamp, you'll need to add one. Insert the cord through the strain relief hole and secure the clamp to prevent the cord from being pulled out.
- Tighten All Connections: Double-check that all wires are securely tightened to the terminal block.
- Final Check: Make sure no wires are exposed or touching the metal body of the dryer.
- Plug In and Test: Plug the dryer back into the electrical outlet. Turn on the circuit breaker at the panel. Test the dryer to ensure it's operating correctly.
Remember, if you're not comfortable working with electricity, it's always best to consult a professional electrician to ensure a safe and proper installation.
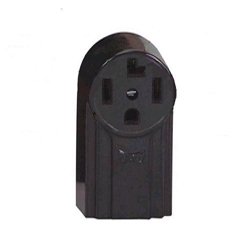
Here is a picture of a 4-wire cable outlet:

The 4-wire connection is the new updated circuit. The only difference is the addition of an isolated ground wire separate from the neutral as mentioned earlier.
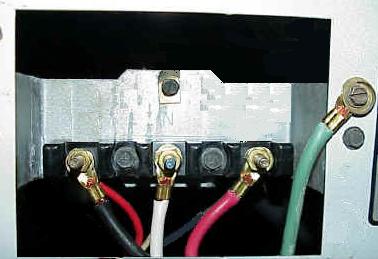
A 4-wire cord consist of a 4 conductor cable with wires colored coded as Black (Hot), Red (Hot), White (Neutral) and Green (Ground). In a 4-wire circuit, the neutral and ground are isolated. The connections on your dryer should have three connection terminals. Left is hot - middle is neutral - and right is hot. You should notice a black & red wire from the dryer already connected to these terminals in the same manner. The middle connections ground strap which connects to the white or neutral connection will be taken off in order to keep the neutral and ground isolated. The green wire (Ground) will attach to the frame of the dryer which protects the unit from stray or live voltage.

4-Wire
Step-by-step procedure to wire a dryer cord:
Materials you'll need:
- New 4-wire dryer cord (matching the amperage of your dryer)
- Screwdriver
- Wire stripper
- Wire nuts (if needed)
- Strain relief clamp (if not included with the cord)
- Pliers
Here's How:
- Safety First: Unplug the dryer from the electrical outlet and turn off the breaker that supplies power to the dryer circuit at the circuit breaker panel.
- Remove the Old Cord: If your dryer is currently using a 3-wire cord, you'll need to remove it. Unscrew the terminal screws on the terminal block at the back of the dryer to release the wires.
- Prepare the New Cord: Examine the new 4-wire dryer cord. It should have four wires: black (hot), red (hot), white (neutral), and green (ground). Strip about 1/2 inch of insulation from the ends of each wire using a wire stripper.
- Attach the Ground Wire: Insert the green wire into the center or top terminal on the terminal block (where the grounding screw is located). Tighten the screw to secure the wire. If a separate grounding screw is provided, use it to attach the ground wire.
- Attach the Neutral Wire: Insert the white wire into the terminal on the terminal block labeled "N" or "Neutral." Tighten the screw to secure the wire.
- Attach the Hot Wires: The remaining black and red wires are the hot wires. There should be two remaining terminals, often labeled "L1" and "L2" or "X" and "Y."
Insert the black wire into one of these terminals. Tighten the screw to secure the wire. Insert the red wire into the other terminal. Tighten the screw to secure the wire. - Strain Relief (if needed): If the new cord did not come with a strain relief clamp, you'll need to add one. Insert the cord through the strain relief hole and secure the clamp to prevent the cord from being pulled out.
- Tighten All Connections: Double-check that all wires are securely tightened to the terminal block.
- Final Check: Make sure no wires are exposed or touching the metal body of the dryer.
- Plug In and Test: Plug the dryer back into the electrical outlet. Turn on the circuit breaker at the panel. Test the dryer to ensure it's operating correctly.
Remember, if you're not comfortable working with electricity, it's always best to consult a professional electrician to ensure a safe and proper installation.
See Also:


